


Explanation of screen
PC and Tablet (landscape) version
Figure shows a screenshot when the application is accessed using a PC browser.
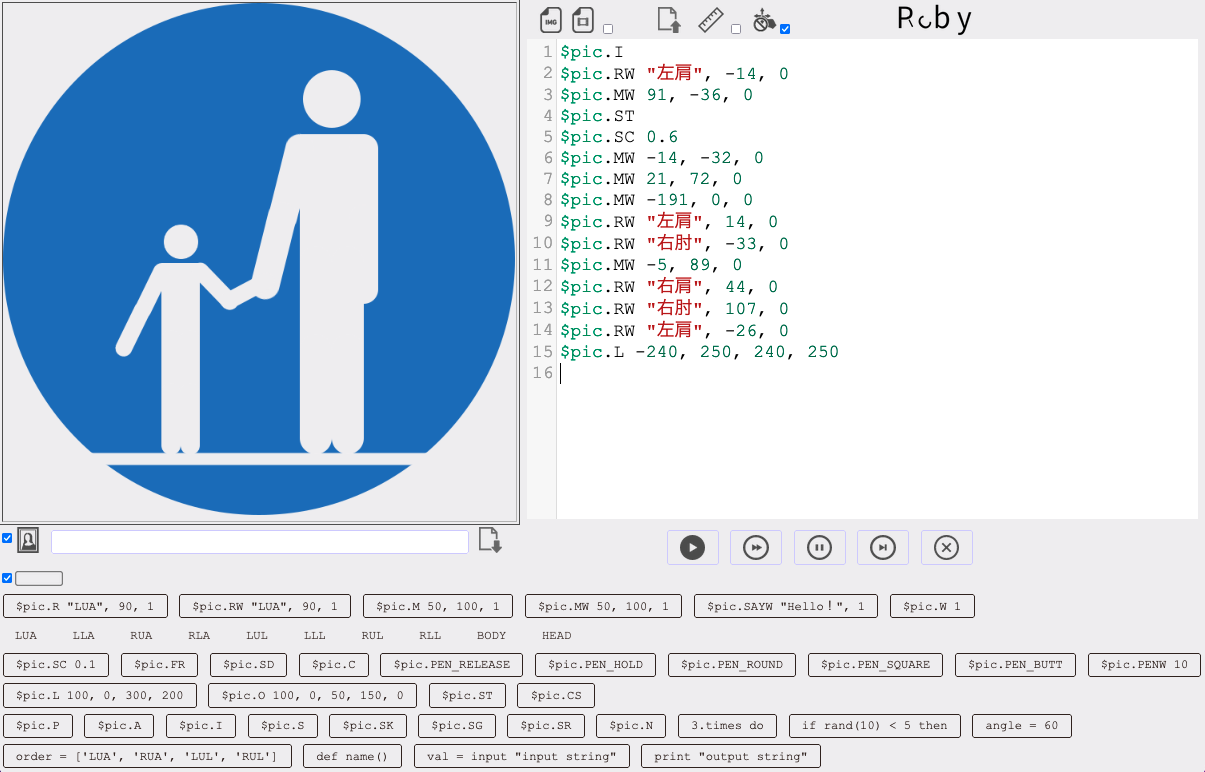
The screen consists of three parts. The upper left is the “pictogram display area” for displaying pictograms, the upper right is the “program code input area” for describing programs, and the lower is the “program code input assist button” for supporting program input.
The pose of the human shaped pictogram can be changed or moved by entering a program in the program code description area. You can also add the statement to the “Program code input area” by pressing the “Program code input assist button”. Code can be written in Ruby languages.
Options according to the purpose of use
You can turn on and off four functions according to the purpose of use.
| Icon(Name) | Explanation |
|---|---|
| When the check box displayed on the right of the image is turned on, the coordinate system is displayed. The coordinates are in the XY coordinate system (the X and Y values are combined to represent the position). The horizontal direction is the X coordinate from the left end -320 to the right end 320, and the vertical direction is the Y coordinate from the upper end -320 to the lower end 320. That is, the center is (0,0), the upper left is (-320, -320), the upper right is (320, -320), the upper left is (-320, -320), the upper right is (320, -320). | |
| When the check box displayed to the right of the image is turned off, the human shaped pictogram can be operated by dragging the body part of the pictogram directly on the “Pictogram display area”. You can also draw a line segment by dragging the start point to a point other than the body part of the human shaped pictogram. |
Control buttons
Playback, stop and so on are controlled from the control buttons.
| Icon(Name) | Explanation |
|---|---|
| Play the animation from the beginning. | |
| Fast forward playback from the beginning. Useful for getting an overview when the overall execution time is long. | |
| Stop the animation. | |
| Play the animation from stopped state. | |
| Clear the program written in the “program code input area”. A confirmation dialog box appears before erasing. |
Command List
List of Pictogram Animation commands
|
Command Format |
Process |
|---|---|
| $pic.R arg1, arg2, arg3, arg4 |
After arg4 seconds, rotate arg1, a part of the body, arg2 degrees counterclockwise over arg3 seconds. If arg4 is omitted, then arg4 is treated as 0. If arg3 and arg4 are omitted, the arg3 and arg4 are both treated as 0. |
| $pic.RW arg1, arg2, arg3 |
Rotate arg1, a part of the body, arg2 degrees counterclockwise over arg3 seconds.The next command is not executed until the movement is complete. If arg3 is omitted, then arg3 is treated as 0. |
| $pic.M arg1, arg2, arg3, arg4 |
After arg4 seconds, move arg1 pixels in an X-axis positive direction and arg2 pixels in a Y-axis positive direction with linear uniform motion over arg3 seconds. If arg4 is omitted, then arg4 is treated as 0. If arg3 and arg4 are omitted, then arg3 and arg4 are both treated as 0. |
| $pic.MW arg1, arg2, arg3 |
Move arg1 pixels in an X-axis positive direction and arg2 pixels in a Y-axis positive direction with linear uniform motion over arg3 seconds. The next command is not executed until the movement is complete. If arg3 is omitted, then arg3 is treated as 0. |
| $pic.FR |
Switch the human pictogram to the front direction. (Initial state) |
| $pic.SD |
Switch the human pictogram to the side direction. |
| $pic.C |
Switch the human pictogram to the initial posture. |
| $pic.SC arg1 |
Change scale to arg1 time(s) from current size. |
| $pic.SP arg1 |
Human pictogram speaks a sentence arg1. |
| $pic.SAY arg1, arg2, arg3 |
After arg3 seconds, say arg1with balloon over arg2 seconds. If arg3 is omitted, then arg3 is treated as 0. If arg2 and arg3 are omitted, the arg2 and arg3 are both treated as 0. |
| $pic.SAYW arg1, arg2 |
Say arg1 with balloon over arg2 seconds.The next command is not executed until the saying is complete. |
List of Pictogram Graphics commands
| Command Format | Process |
|---|---|
| $pic.PEN arg1 [, arg2] |
Release Pen if arg1 is “RELEASE” or “UP”, hold pen if arg1 is “HOLD” or “DOWN.” A part of body can be set as arg2 to set the location of releasing or holding the pen only if arg1 is “RELEASE”, “UP”, “HOLD” or “DOWN.” IF arg2 is omitted, it is considered to set “BODY”. Initial state of pen is released for all parts of body. The shape of line’s both edges set square if arg1 is “SQUARE”, set round if arg1 is “ROUND”. No shape is attached at both edges if arg1 is “BUTT”. As for kinds of pen, draw solid line if arg1 is “NORMAL”, erase line if arg 1 is “ERASE”, and erase the part already drawn and draws a part not so if arg1 is “XOR”. Initial shape of line’s edge is square. |
| $pic.PENW arg1 | Set width of pen to arg1.(Initial state is 15) |
| $pic.CS | Clear screen |
| $pic.FD arg1, [arg2] |
Human pictogram moves forward arg1 steps over arg2 second(s). The next command is executed simultaneously. If arg2 is omitted, then arg2 is treated as 0. |
| $pic.BK arg1, [arg2] |
Human pictogram moves backward arg1 steps over arg2 second(s). The next command is executed simultaneously. If arg2 is omitted, then arg2 is treated as 0. |
| $pic.RT arg1, [arg2] |
Turn arg1 degrees clockwise over arg2 second(s). The next command is executed simultaneously. If arg2 is omitted, then arg2 is treated as 0. |
| $pic.LT arg1, [arg2] |
Turn arg1 degrees counterclockwise over arg2 second(s). The next command is executed simultaneously. If arg2 is omitted, then arg2 is treated as 0. |
| $pic.FDW arg1, [arg2] |
Human pictogram moves forward arg1 steps over arg2 second(s). The next command is not executed until the movement is complete. If arg2 is omitted, then arg2 is treated as 0. |
| $pic.BKW arg1, [arg2] |
Human pictogram moves backward arg1 steps over arg2 second(s). The next command is not executed until the movement is complete. If arg2 is omitted, then arg2 is treated as 0. |
| $pic.RTW arg1, [arg2] |
Turn arg1 degrees clockwise over arg2 second(s). The next command is not executed until the movement is complete. If arg2 is omitted, then arg2 is treated as 0. |
| $pic.LTW arg1, [arg2] |
Turn arg1 degrees counterclockwise over arg2 second(s). The next command is not executed until the movement is complete. If arg2 is omitted, then arg2 is treated as 0. |
| $pic.L arg1, arg2, arg3, arg4 |
Draw line from coordinate (arg1, arg2) to coordinate (arg3, arg4). |
| $pic.O arg1, arg2, arg3, arg4, [arg5] | Draw oval with center coordinate(arg1,arg2), width arg3, height arg4, rotating arg5 degrees counter-clockwise.If arg5 is omitted, then arg5 is treated as 0. |
| $pic.MO func, arg1, arg2 arg3 | The diagram defined as func moves at a constant velocity by arg1 pixels in the x-axis positive direction and arg2 pixels in the y-axis positive direction over arg3 seconds. |
| $pic.MOW func, arg1, arg2, arg3 | The diagram defined as func moves at a constant velocity by arg1 pixels in the x-axis positive direction and arg2 pixels in the y-axis positive direction over arg3 seconds. The next command is not executed until the movement is complete. |
| $pic.T arg1, arg2, arg3, [arg4] | Draw text arg1 at current position of human pictogram with font size arg2 if number of given argument is 2.
If number of given argument is more than 2, draw text arg1 with coordinate(arg2,arg3),font size arg4.If arg4 is omitted, then arg4 is treated as 80. |
List of common commands
| Command Format | Process |
|---|---|
| arg1 = exp2 |
Assign expression exp2 to variable arg1. |
| if (exp1) |
Execute until corresponding else if or else or end if condition expression exp1 is true. |
| elsif (exp2) | Execute until corresponding “elsif” or “else” or end if forehead “if” or “elsif” condition expressions is all false. |
| else | Execute until corresponding end if forehead “if” or “elsif” condition expressions is all false. |
| arg1.times do |
Execute until end command arg1 times. |
| $pic.W arg1 |
Wait arg1 seconds. The next command is not executed until the wait is complete. |
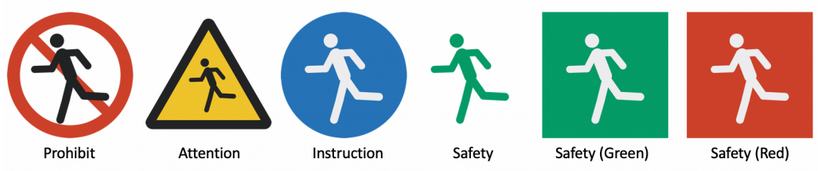
| $pic.P | Change to Prohibit mode. |
| $pic.I | Change to Instruction mode. The drawing line color during Safety mode is white, same as the body color of human pictogram.
|
| $pic.A | Change to Attention mode. |
| $pic.S | Change to Safety mode. The drawing line color during Safety mode is green, same as the body color of human pictogram. |
| $pic.SG | Change to Safety (Green) mode. The drawing line color during Safety mode is white, same as the body color of human pictogram. |
| $pic.SR | Change to Safety (Red) mode. The drawing line color during Safety mode is white, same as the body color of human pictogram. |
| $pic.SK | Change to Skelton mode. |
| $pic.N | Change to Normal mode. |
| $pic.ST | Draw a human pictogram at the time the command is executed. |
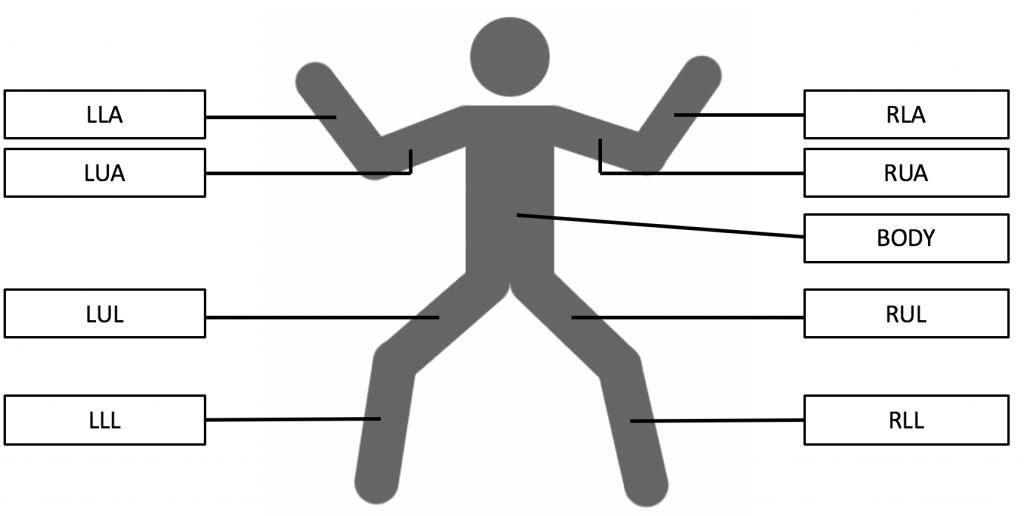
Relations between body parts and notations (This notation is used in arg1 of R,RW,M,MW method and arg2 of PEN method)
| Notation | Part Name | |
|---|---|---|
| BODY | Body | |
| LUA | LeftUpperArm | |
| LLA | LeftLowerArm | |
| RUA | RightUpperArm | |
| RLA | RightLowerArm | |
| LUL | LeftUpperLeg | |
| LLL | LeftLowerLeg | |
| RUL | RightUpperLeg | |
| RLL | RightLowerLeg |
|
Mouse operation and corresponding processing on pictogram display area
The corresponding commands can be added to the program display area automatically by various mouse operations on the pictogram display area.
| Mouse position when drag start | Mouse operation | Processing on pictogram display area |
|---|---|---|
| In the human pictogram display area
(Expect for the drawing point of human pictogram) |
Left click and drag | Rotate correspond part of human pictogram |
| Right click and drag | Translate | |
| Outside the human pictogram display area | Left click and drag | Draw line |
| Right click and drag | Draw Oval | |
| Any | Hold down | Change direction( front and side) of human pictogram |
| A drawing point of human pictogram | Click | Hold and release the pen at a drawing point |
How to download contents
The application provides how to download contents in three ways.
[1. Download program code]
(1) Input the title in “Title input” field. 
(2) Press “Download button”, and the code would be downloaded with a name of “title”.txt (here “title” is a name you inputted in “Title input” field.
![]()
[2. Download shot image]
(1) Press “Image download button”, and the shot image would be downloaded with a name of “title”.png (here “title” is a name you inputted in “Title input” field.
![]()
[3. Download animation]
(1) Turn on the check button to the right of the video download button.

(2) Execute once from the beginning to the end. Although it runs slowly, animated image are generated dynamically.
(3) Press “Movie download button”, and the animation file would be downloaded with a name of “title”.gif (here “title” is a name you inputted in “Title input” field.
![]()