


How to use Natural Language Pictogramming
Screenshot
Figure shows a screenshot when the application is accessed using a PC browser.
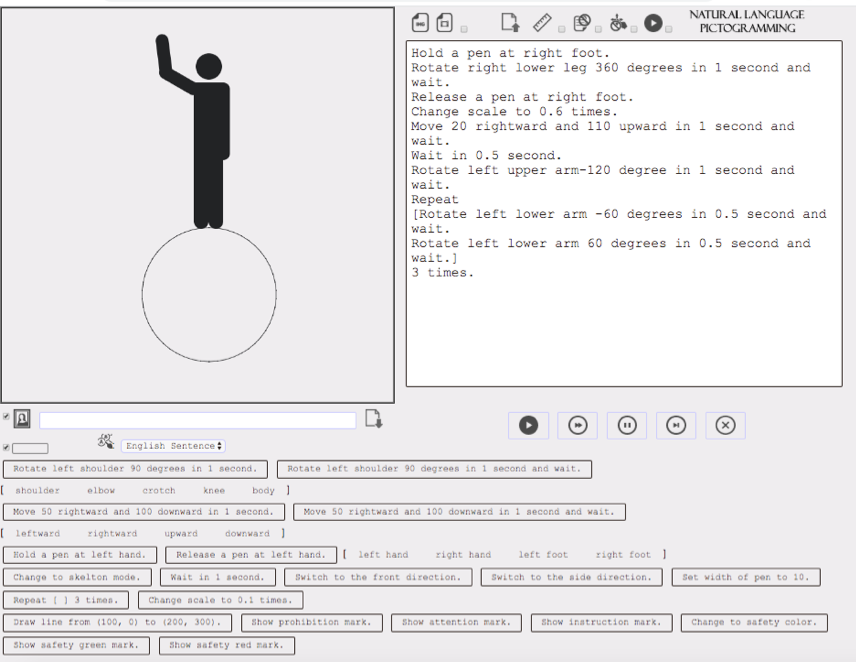
The screen consists of three parts. The upper left is the “pictogram display area” for displaying pictograms, the upper right is the “program code input area” for describing programs, and the lower is the “program code input assist button” for supporting program input.
The pose of the human shaped pictogram can be changed or moved by entering a program in the program code description area. You can also add the statement to the “Program code input area” by pressing the “Program code input assist button”. Code can be written in natural languages.
Options according to the purpose of use
You can turn on and off four functions according to the purpose of use.
| Icon(Name) | Explanation |
|---|---|
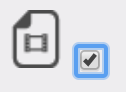
| When the check box displayed on the right of the image is turned on, the coordinate system is displayed. The coordinates are in the XY coordinate system (the X and Y values are combined to represent the position). The horizontal direction is the X coordinate from the left end -320 to the right end 320, and the vertical direction is the Y coordinate from the upper end -320 to the lower end 320. That is, the center is (0,0), the upper left is (-320, -320), the upper right is (320, -320), the upper left is (-320, -320), the upper right is (320, -320). | |
| When the check box displayed on the right of the image is turned on, the “Program code input area” is hidden. Use this when you want to create a pictogram just by dragging the mouse, such as when designing classes or when young children use it. | |
| When the check box displayed to the right of the image is turned off, the human shaped pictogram can be operated by dragging the body part of the pictogram directly on the “Pictogram display area”. You can also draw a line segment by dragging the start point to a point other than the body part of the human shaped pictogram. |
Control buttons
Playback, stop and so on are controlled from the control buttons.
| Icon(Name) | Explanation |
|---|---|
| Play the animation from the beginning. | |
| Fast forward playback from the beginning. Useful for getting an overview when the overall execution time is long. | |
| Stop the animation. | |
| Play the animation from stopped state. | |
| Clear the program written in the “program code input area”. A confirmation dialog box appears before erasing. |
How to download contents
The application provides how to download contents in three ways.
[1. Download program code]
(1) Input the title in “Title input” field. 
(2) Press “Download button”, and the code would be downloaded with a name of “title”.txt (here “title” is a name you inputted in “Title input” field.
![]()
[2. Download shot image]
(1) Press “Image download button”, and the shot image would be downloaded with a name of “title”.png (here “title” is a name you inputted in “Title input” field.
![]()
[3. Download animation]
(1) Turn on the check button to the right of the video download button.
(2) Execute once from the beginning to the end. Although it runs slowly, animated image are generated dynamically.
(3) Press “Movie download button”, and the animation file would be downloaded with a name of “title”.gif (here “title” is a name you inputted in “Title input” field.
![]()
Command List
| Command Format | Process |
|---|---|
| Rotate arg1 arg2 degree in arg3 second. | Rotate arg1, a part of the body, arg2 degrees counterclockwise over arg3 seconds. If arg3 is omitted, then arg3 is treated as 0. |
| Rotate arg1 arg2 degree in arg3 second and wait. | Rotate arg1, a part of the body, arg2 degrees counterclockwise over arg3 seconds.The next command is not executed until the movement is complete. If arg3 is omitted, then arg3 is treated as 0. |
| Move arg1 rightward and arg2 downward in arg3 second. | Move arg1 pixels in an X-axis positive direction and arg2 pixels in a Y-axis positive direction with linear uniform motion over arg3 seconds. If arg3 is omitted, then arg3 is treated as 0. |
| Move arg1 rightward and arg2 downward in arg3 second and wait. | Move arg1 pixels in an X-axis positive direction and arg2 pixels in a Y-axis positive direction with linear uniform motion over arg3 seconds. The next command is not executed until the movement is complete. If arg3 is omitted, then arg3 is treated as 0. |
| Wait in arg1 second. | Wait arg1 seconds. The next command is not executed until the wait is complete. |
| arg1 a pen at arg2. | arg1 is “hold” or “release”, to hold or release a pen at arg2. arg2 is a name of part of body. |
| Set width of pen to arg1. | Set width of pen to arg1. |
| Change scale to arg1 times. | Change scale to arg1 times. |
| Draw line from (arg1, arg2) to (arg3, arg4). | Draw line from coordinate (arg1, arg2) to coordinate (arg3, arg4). |
| Repeat [The command repeated] arg1 times. | Execute commands surrounded by [ ] arg1 times. |
| Change scale to arg1 times. | Change scale to arg1 times. |
| Switch to the front direction. | Switch to the front direction. |
| Switch to the side direction. | Switch to the side direction. |
| Change to skeleton mode. | Change to skeleton mode. |
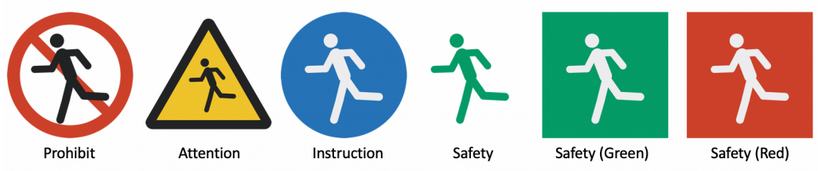
| Show prohibition mark. | Show prohibition mark. |
| Show attention mark. | Show attention mark. |
| Show instruction mark. | Show instruction mark. |
| Change to safety color. | Change to safety color. |
| Show safety green mark. | Show safety green mark. |
| Show safety red mark. | Show safety red mark. |
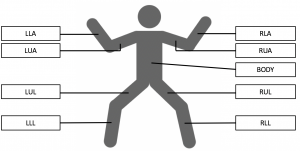
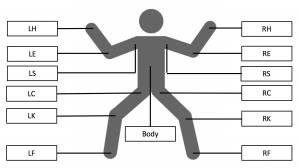
Relations between body parts and notations (This notation is used in arg1 of “rotate” command and arg2 of “pen” command)
 |
 |